

How To Add Hard Drive Windows 10
This browser is no longer supported.
Upgrade to Microsoft Border to take reward of the latest features, security updates, and technical back up.
Initialize new disks
Applies To: Windows 10, Windows 8.1, Windows 7, Windows Server 2019, Windows Server 2016, Windows Server 2012 R2, Windows Server 2012
If you add a brand new disk to your PC and it doesn't show upward in File Explorer, you might need to add together a bulldoze letter, or initialize it before using it. You can only initialize a drive that's not yet formatted. Initializing a disk erases everything on it and prepares information technology for utilize by Windows, after which y'all can format information technology and then shop files on information technology.
To initialize new disks
Here's how to initialize a new disk using Disk Management. If you prefer using PowerShell, utilize the initialize-disk cmdlet instead.
-
Open Disk Management with administrator permissions.
To do so, in the search box on the taskbar, type Deejay Management, select and concord (or correct-click) Disk Management, then select Run as ambassador > Yes. If you can't open up it as an administrator, type Calculator Management instead, so go to Storage > Deejay Management.
-
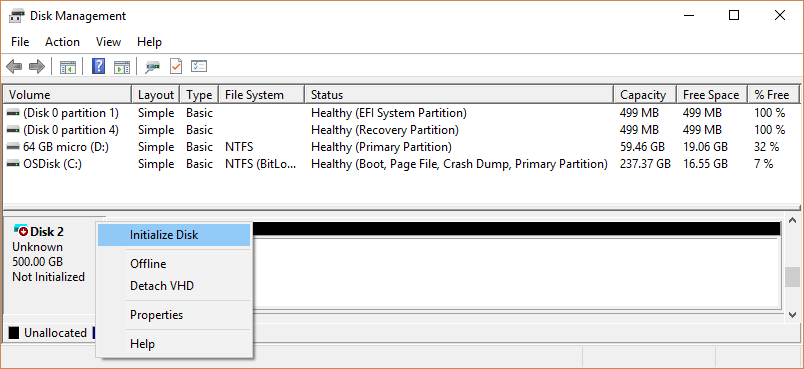
In Deejay Management, right-click the disk y'all want to initialize, and then click Initialize Deejay (shown here). If the disk is listed equally Offline, first right-click it and select Online.
Note that some USB drives don't have the option to exist initialized, they only become formatted and a drive letter.
-
In the Initialize Disk dialog box (shown here), check to brand sure that the right disk is selected and so click OK to accept the default partition style. If you need to change the division way (GPT or MBR) see About sectionalization styles - GPT and MBR.
The disk status briefly changes to Initializing and then to the Online status. If initializing fails for some reason, see A disk's condition is Not Initialized or the disk is missing entirely.

-
Select and hold (or right-click) the unallocated space on the drive and so select New Simple Volume.
-
Select Side by side, specify the size of the book (you'll likely desire to stick with the default, which uses the whole drive), and then select Next.
-
Specify the drive letter you want to assign to the book and and so select Side by side.
-
Specify the file system you want to use (usually NTFS), select Next, and and then Cease.
Most partition styles - GPT and MBR
Disks can exist divided up into multiple chunks called partitions. Each sectionalization - even if you take merely one - has to have a sectionalization style - GPT or MBR. Windows uses the sectionalisation way to empathize how to access the data on the disk.
Equally fascinating as this probably isn't, the bottom line is that these days, you don't commonly have to worry near partition style - Windows automatically uses the advisable disk blazon.
Most PCs utilize the GUID Division Tabular array (GPT) disk blazon for hard drives and SSDs. GPT is more robust and allows for volumes bigger than 2 TB. The older Master Boot Tape (MBR) deejay type is used by 32-bit PCs, older PCs, and removable drives such as memory cards.
To convert a disk from MBR to GPT or vice versa, you lot first have to delete all volumes from the disk, erasing everything on the disk. For more info, come across Convert an MBR disk into a GPT deejay, or Catechumen a GPT disk into an MBR disk.
Feedback
Submit and view feedback for

How To Add Hard Drive Windows 10,
Source: https://docs.microsoft.com/en-us/windows-server/storage/disk-management/initialize-new-disks
Posted by: stantonexpon1997.blogspot.com
0 Response to "How To Add Hard Drive Windows 10"
Post a Comment